Chapter 7 Managing Seed Lots
Seedlots are different from Accessions in that they represent the physical seed being evaluated in an experiment. Seedlots have things like physical storage locations and seed quantities, which accessions do not. The seed in seedlots can be from crosses or can be named accessions. Seedlots from crosses would represent seed harvested. Click Manage and then Seed Lots to begin.

7.1 Add New Seedlot(s)
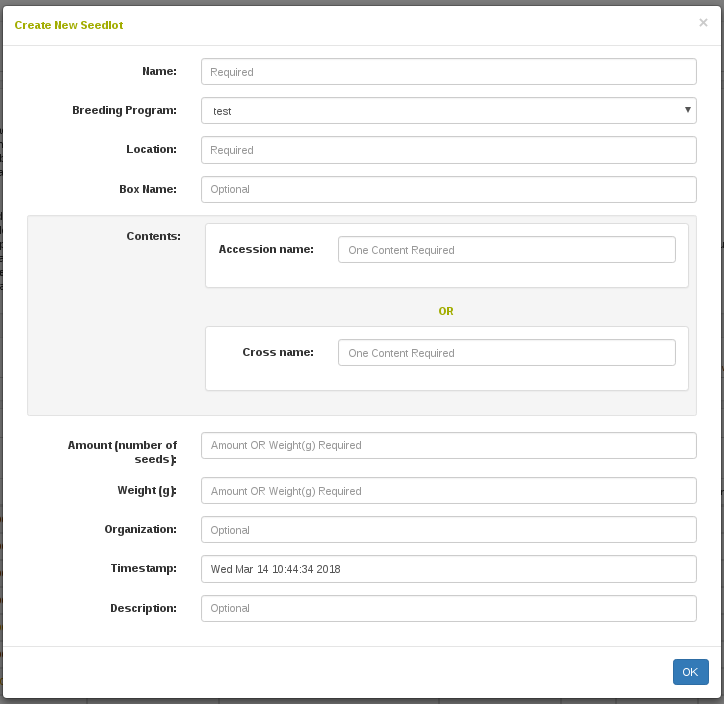
To add a single new seedlot, click on “Add Seedlot”. This will bring up the following dialog where you enter information about where the seedlot exists, what accession or cross is contained in it, and how many seeds there are. A seedlot must contain either an accession or a cross, and not both. A seedlot must have a weight in grams or a seed count or both of these.
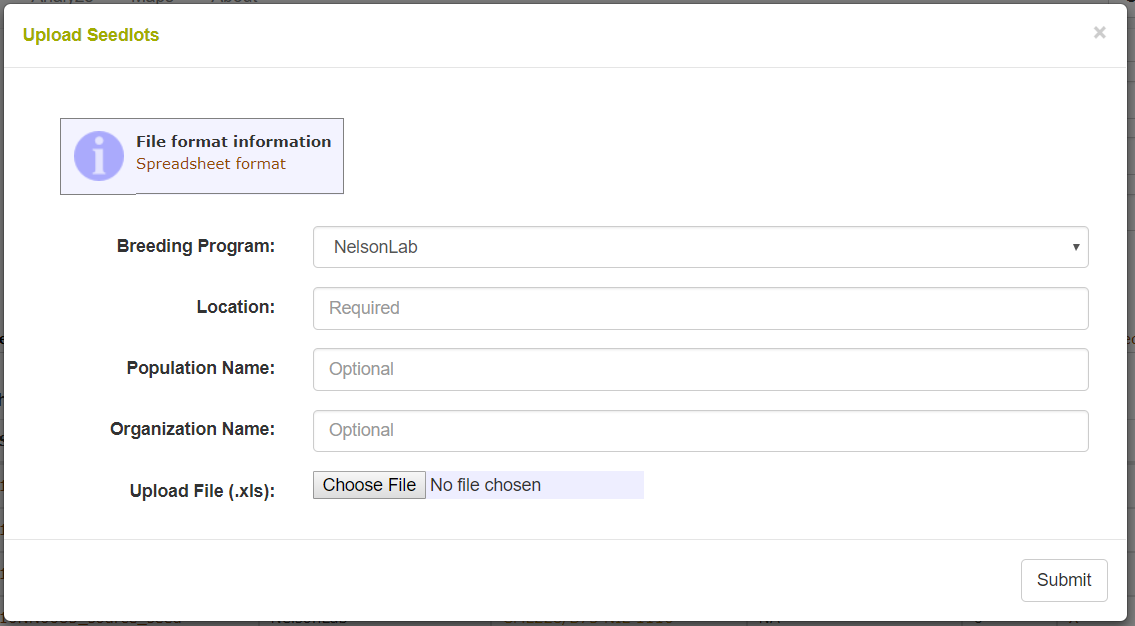
In the case where you have many seedlots to add to the database, you can upload an excel XLS or XLSX file instead. Click “Upload Seedlots” to see the following dialog.
7.2 Seedlot Transactions
Seedlots are capable of tracking where seeds came from, such as from crosses, and to where seeds go, such as to plots in the field. If you navigate to a seedlot detail page you will see the following.

On this page you see and can edit information regarding a single seedlot, such as its name and location. You will also see a table indicating all t he transactions that a seedlot has been involved in, such as if it was planted in a plot in the field. Transactions to field plots are created when adding or uploading a new trial or from a trial’s detail page. Clicking on “Add New Transaction” let you add a transaction from between this seedlot and another seedlot. This kind of transaction is useful for representing if you have distributed seed to different locations.
![]()
7.3 Seed Inventory
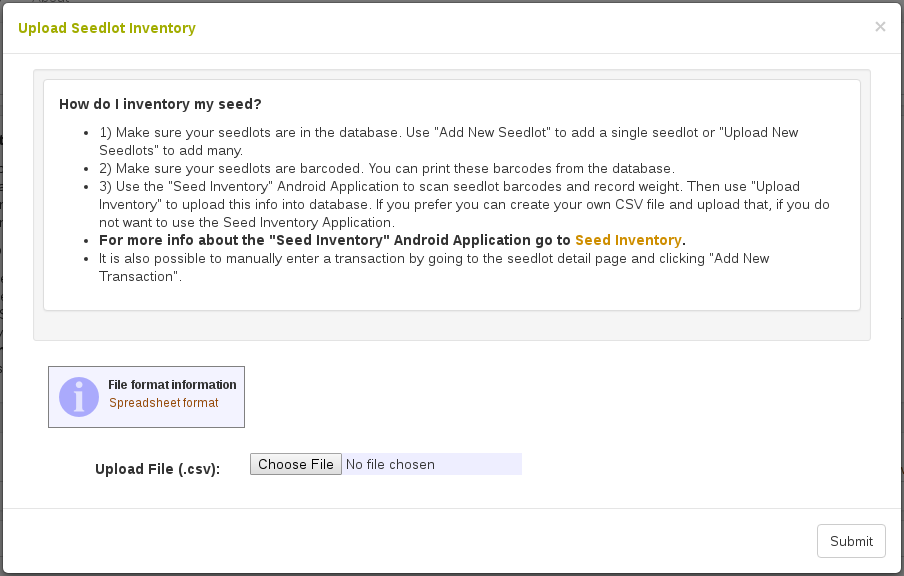
To inventory your seed: 1) Make sure your seedlots are in the database. Use “Add New Seedlot” to add a single seedlot or “Upload New Seedlots” to add many. 2) Make sure your seedlots are barcoded. You can print these barcodes from the database. 3) Use the “Inventory” Android Application to scan seedlot barcodes and record weight. Then use “Upload Inventory” to upload this info into database. If you prefer you can create your own CSV file and upload that, if you do not want to use the Inventory Application. For more info about the “Inventory” Android Application go to Inventory.
Clicking the “Upload Inventory” button will bring the following dialog:
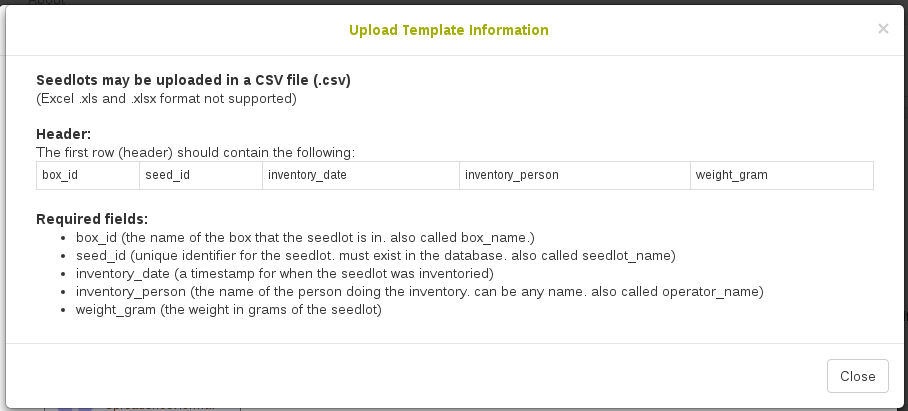
The CSV file that should contain your inventory should meet these Template requirements. The Seed Inventory Android Application exports this exact file.
7.4 Find Seedlots For a List of Accessions
A convenient tool for searching available seedlots for a list of accessions is available in the list tool. First open up your list of accessions. For help opening a list of accessions please see the List section help. There is a button called “See Available Seedlots”.

Once you click this, you will see the following table in a dialog. From here you can create a list of seedlots using the checkboxes and the input at the bottom.

7.5 Create a seedlot for an Accession or Cross
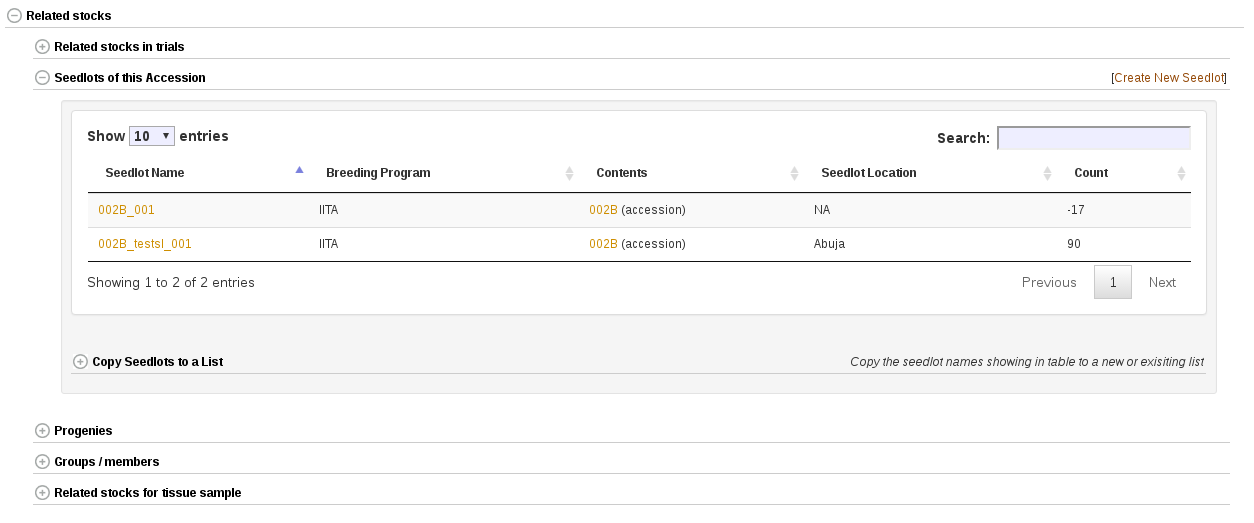
Complementary to what we saw above for creating seedlots from the “Manage Seedlots” page, it is possible to create a new seedlot from an accession’s detail page or from the cross detail page. On the accession detail page, this is visible in the “Related Stocks” section as seen below. The cross detail page has an identical section. Notice the link for creating a new seedlot, which streamlines adding the seedlot.
7.6 Add quality data to a seedlot
Quality information can be added to a seedlot in the quality field. This is also available as a column in the file upload format. It is recommended to use a controlled vocabulary, defined by the user, for the quality field. For example, good quality seed should be labelled “ok”, whereas other quality descriptors could be “moldy”, “insect damage”, or “low sprouting”, etc.
7.7 Seedlot Maintenance Events
For some crops, such as sugar kelp, a “seedlot” requires routine maintenance for the successful long-term storage of the seedlot. (For example, a Seedlot Maintenance Event for sugar kelp would be the routine change of the water that gametophytes are kept it). Breedbase can now store a record of these Seedlot Maintenance Events associated directly with existing Seedlots. Maintenance Events can be uploaded using a simple Excel template or recorded directly on the website.
7.7.1 Setup
Each Breedbase instance needs to be configured to support the storage of Seedlot Maintenance Events since each crop will have their own distinct set of maintenance events for their seedlots. To check if your Breedbase instance supports this feature, go to the Manage menu and select the Seed Lots page. Make sure you are logged in and look for the Seedlot Maintenance button near the top, next to the Create Seedlot(s) and Upload Inventory buttons. If you don’t see this button, contact the developer(s) supporting your Breedbase instance and ask if they can setup this feature.
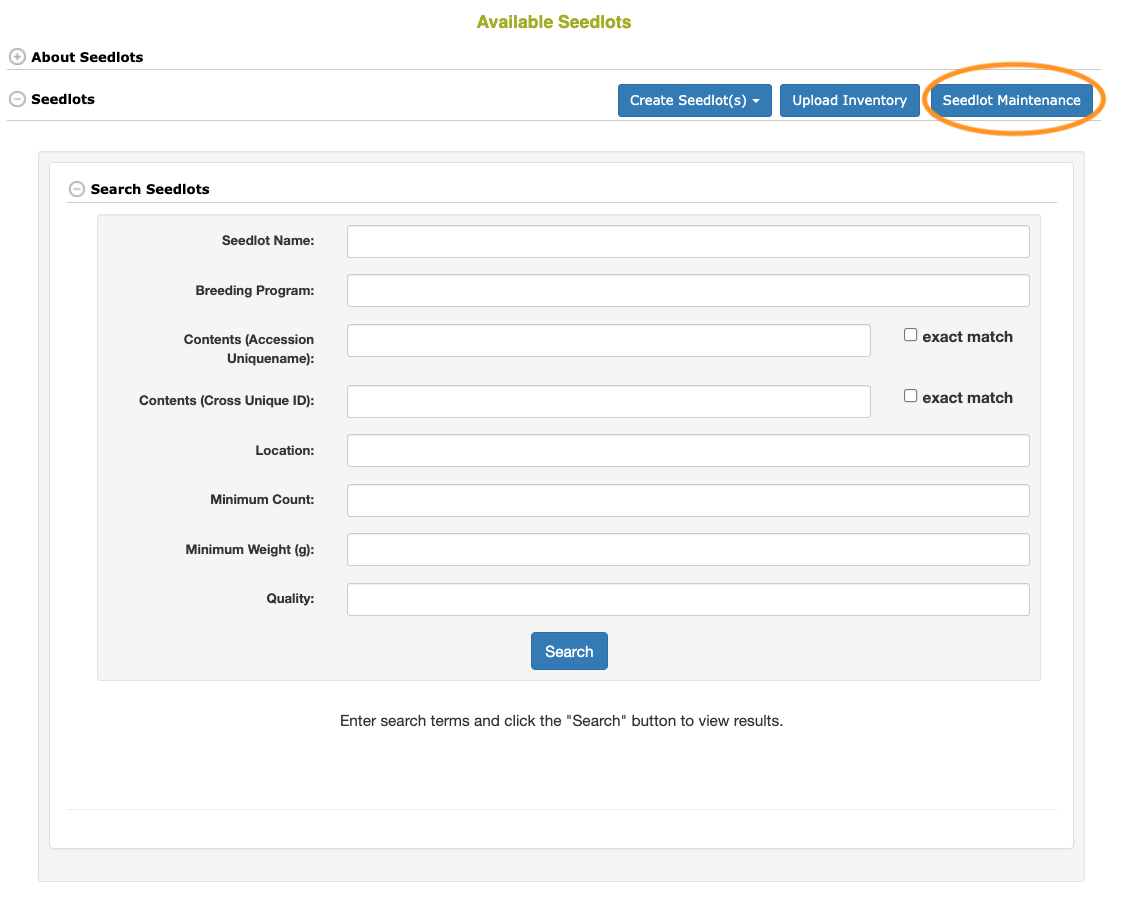 The location of the Seedlot Maintenance button on the Manage > Seed Lots page
7.7.2 Adding Events
Seedlot Maintenance Events can be added using two methods: 1) Uploading an Excel template or 2) Recording events directly on the website
Uploading Events with Excel Template
To bulk-upload a file of Seedlot Maintenance Events, first create an Excel (.xls or .xlsx) file with the following headers:
- seedlot - the name of the Seedlot to associate the event with (must exactly match an existing Seedlot in the database)
- type - the name of the Seedlot Maintenance Event type (these vary between Breedbase instances, a list of supported event types is displayed on the upload page)
- value - the value of the Seedlot Maintenance Event (these may be different for each event type and vary between Breedbase instances, a list of supported event values is displayed on the upload page)
- notes - optional, additional notes/comments about the event
- operator - the username of the Breedbase user that recorded the event
- timestamp - the date/time the event was recorded, in ‘YYYY-MM-DD HH:MM:SS’ format
Once you have an Excel file with the events filled out, follow these steps to upload the events to the database:
- Make sure you are logged in to your Breedbase instance
- Go to the Manage > Seed Lots page
- Select the Seedlot Maintenance button
- Select the Upload Maintenance button
- Choose your Excel (.xls or .xlsx) file to upload
- Select the Upload button
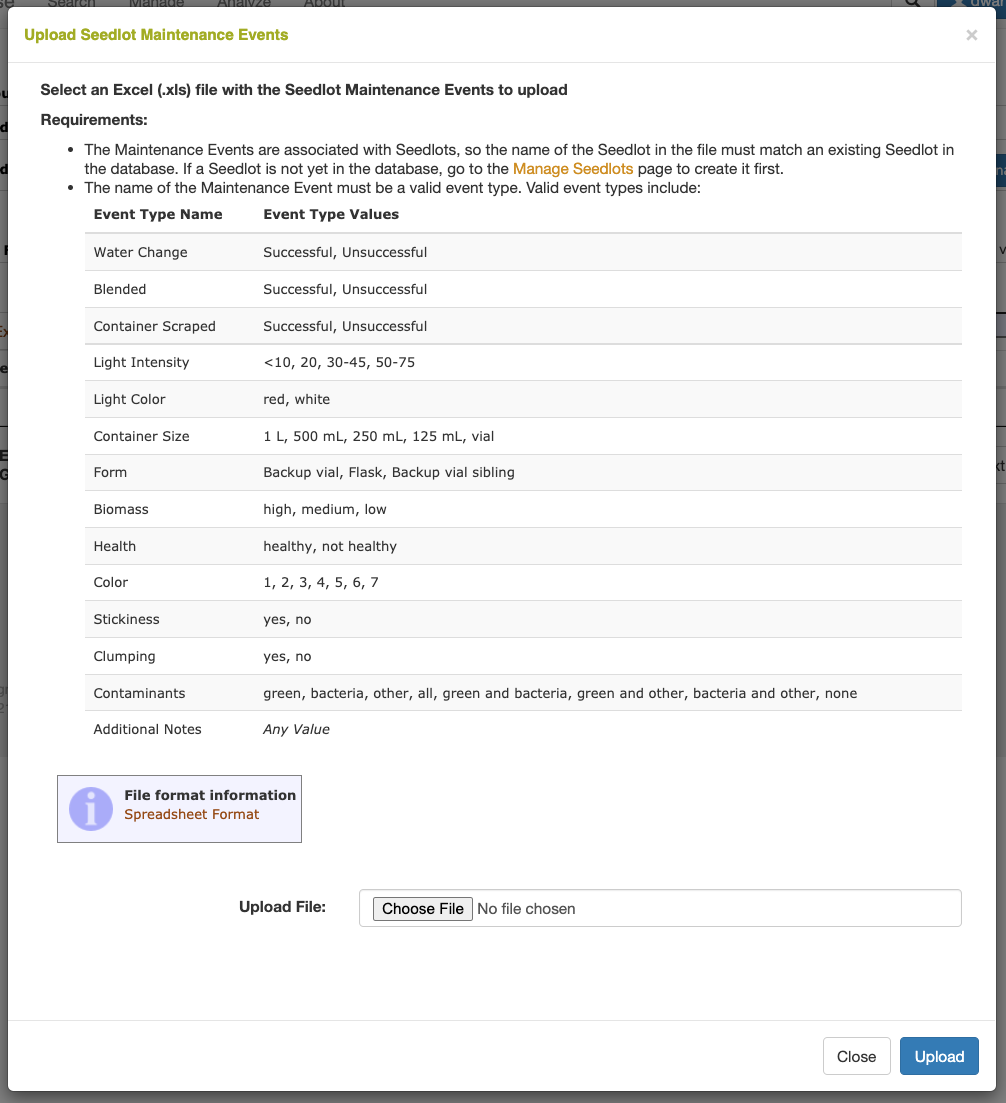 The Seedlot Maintenance upload dialog, showing the supported event types and values (for sugar kelp)
Recording Events on Website
To add individual Seedlot Maintenance Events to the database in real time, as they’re being recorded, use the Record Maintenance page. Follow these steps to record Seedlot Maintenance Events:
- Make sure you are logged in to your Breedbase instance
- Go to the Manage > Seed Lots page
- Select the Seedlot Maintenance button
- Select the Record Maintenance button
- Enter the Seedlot Name or scan a barcode that has the Seedlot Name encoded. Once entered, the box at the top of the page will display basic information about the Seedlot as well its recently recorded events.
- Select or Enter the values of individual events
- Optionally, notes button next to each event to add additional notes/comments about that specific event
- Make sure the operator/username and timestamp are correct
- Select the Submit button to add the recorded events to the database. NOTE: any events that remain selected as “Not Recorded” will not be submitted to the database.
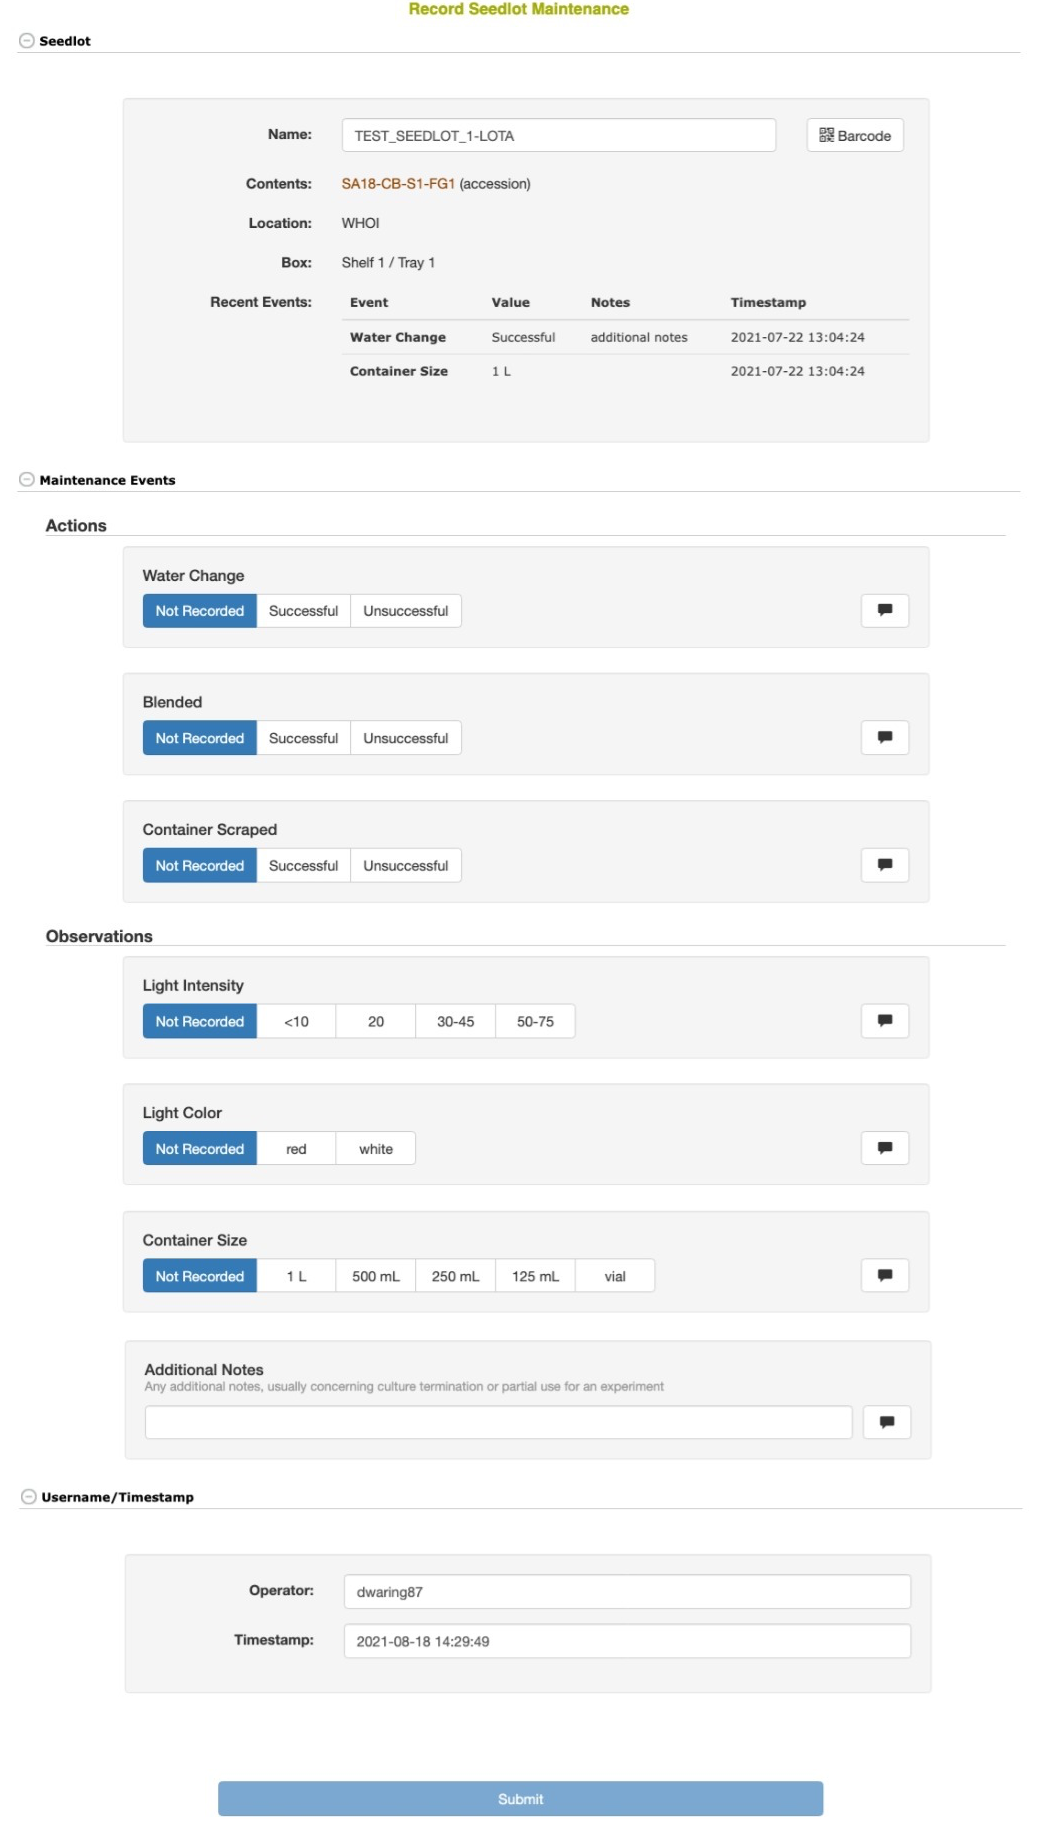 The Seedlot Maintenance record page, as configured for sugar kelp
7.7.3 Displaying Events
Recently recorded Seedlot Maintenance Events are displayed in a table from the main Seedlot Maintenance page, as well as the detail page for individual Seedlots.
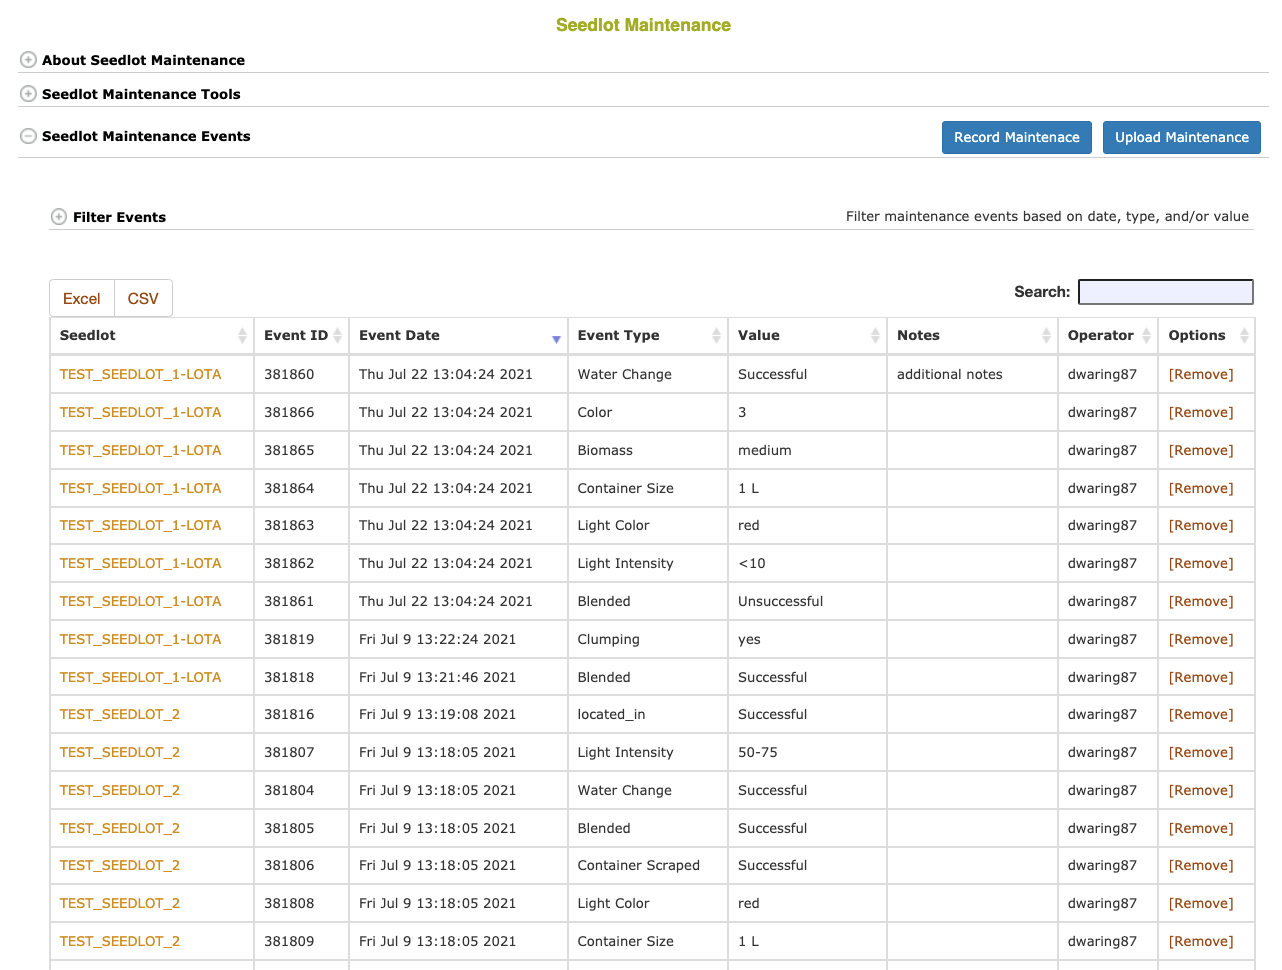 Unfiltered table of recent Seedlot Maintenance events
The events displayed in these tables are sorted by timestamp, with the most recently recorded events displayed first. The displayed events can be filtered using any number of supported filter criteria, such as: - seedlot names (as entered on the page or using an existing seedlot list), - dates (on, on or before, before, on or after, and/or after the entered dates) - event types - event type values - operator/username
Select the properties of the filter(s) you want to apply, then select the Add button next to the button to add the filter to the list of applied filters. Once you’re done adding filters, select the Filter button to search the database for the filtered events.
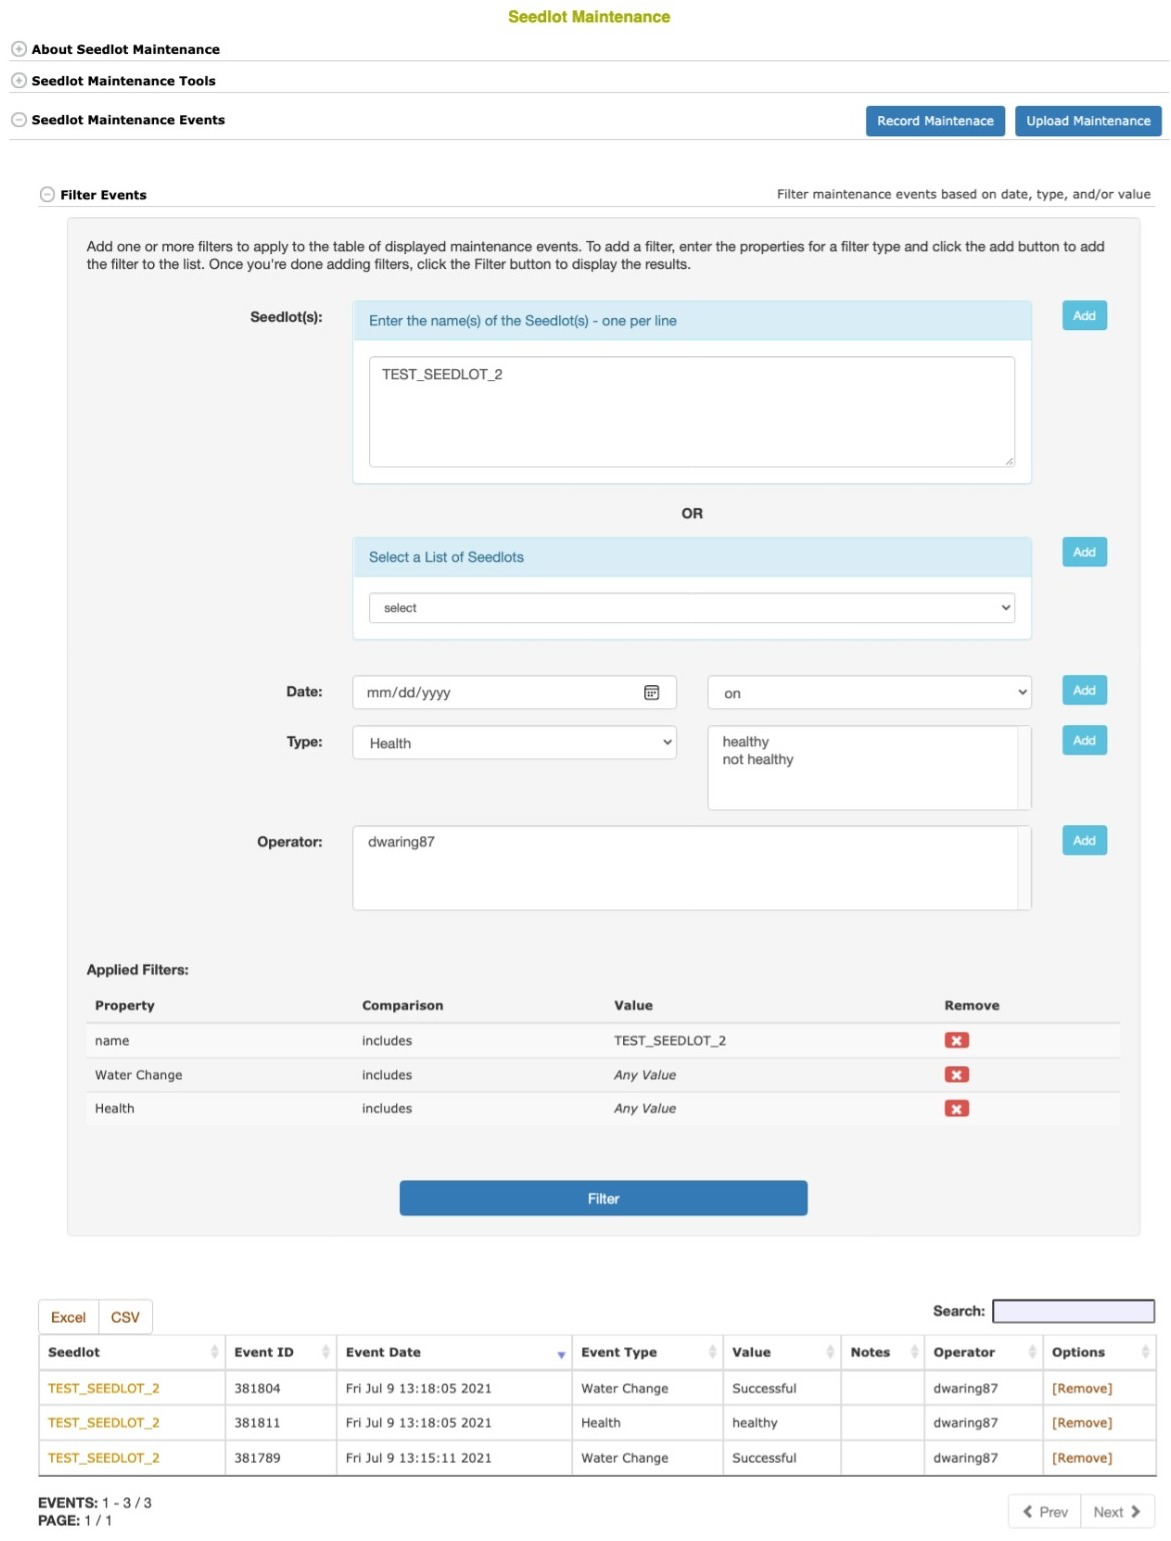 A filtered table of Seedlot Maintenance events
The filtered events can be downloaded directly from the table using the Excel or CSV buttons at the top of the table. Or Seedlot Maintenance Events can be bulk-downloaded (this includes all events for a Seedlot) using a list of Seedlots from the main downloads page (see below).
7.7.4 Downloading Events
To bulk-download all events for a specific subset of Seedlots:
- Create a list containing the Seelots you are interested in.
- Go to the Download Using Lists page (Manage > Download)
- Find the Download Seedlot Maintenance Events section
- Select your list of Seedlots
- Select the Download button to generate the download file
The downloaded file will follow the same format as the upload template and will contain all recorded Seedlot Maintenance Events for each Seedlot in the list.
7.8 Deleting Seedlots
Seedlots can be deleted on the Manage Seedlots page (/breeders/seedlots) by search the seedlot and then clicking the X to delete one seedlot at a time. To delete a seedlot, the logged in user needs the required delete privileges on the seedlot. The seedlot also should not have any transactions associated with it (except for the initial transaction).
To delete seedlots in bulk, generate a list of type seedlot, for example, using the wizard. Open the section “Delete seedlots using a list” on the Manage Seedlots page and select the list. Seedlot deletion using a list is only available to user with curator status.