Chapter 1 Basic Website Usage
Breedbase is usually hosted on the cloud and is entirely web-based, with only a browser required to access and use it. The recommended browser is Firefox. To use Breedbase, you or your project will usually need to have your own Breedbase instance. Information how you can obtain your own instance can be obtained from the Breedbase project (https://breedbase.org/).
Once an instance is set up, the site needs to be configured and some metadata uploaded before you can design, run and analyze trials:
define user accounts and their access privileges.
add a trait ontology with the traits that you require.
add the locations that you use in your breeding program
add the foundational germplasm and the respective pedigree data
“historical” trial data can be uploaded as needed. Usually more recent trials are prioritized over older trials
In this chapter, we will cover how you can manage the user accounts and some basic website features such as lists and how to navigate the menus. The other topics are covered in subsequent chapters. Note that Breedbase instances are highly customizable, and that not every instance of Breedbase will have the same options in the same location. Refer to the site specific documentation, if any, for site specific information.
1.1 Creating a User Account
1.1.1 Verifying first that you do not already have an account
Before creating an account, please verify first that you don’t already have an account. You can use “Search” menu to check if you already registered as a user.
In the “Search” menu, selecting the “People” tab and search your name. If nothing is found, proceed with the instructions below. Otherwise, continue by clicking the “Login” button. If you have forgotten your password, you can retrieve it by clicking the “Forgot your password?” link on the login page.
1.1.2 Creating a user account
On the right of the toolbar, click on “Login”, which will take you to the login dialog. On the login dialog, click on the link “sign up for an account.” It will take you to the page below:

Filling in all of the information, then click “Create Account.”
After you submit the information, an email will be sent to the provided email address. Check your email and click on the link to activate your account.
1.2 Managing your Account
1.2.1 Login
To login, click the “Login” link in the toolbar on any page and enter your username and password.
If you have forgotten your password, you can retrieve it by clicking the “Forgot your password?” link on the login page.

1.2.2 Editing Account Settings
Account settings can be edited by clicking on the “my profile” link displayed as your user name, on the right of the toolbar. You must be logged in order to access and change account settings.

You can add personal information to your account using the “View or update personal information” link.
To change your password, username, or your contact email, click on “Update account information” link. You must provide your old password before you can make any changes.

1.2.3 Changing Your Account Status: From “User” to “Submitter”
After you create an account, your account has a “user” status. This account has limited privileges.
Accounts with “user” status are able to:
- Change personal information
- Post comments on pages
- Post to the forum
To upgrade your account status to “submitter,” contact the database curators using the “contact” link provided at the footer of each page. Submitter accounts can add data, such as new plots, accessions, phenotypic data and images.
1.4 Working with Lists
Lists are collections of identifiers that are stored in the database. Lists can be composed of accessions, plots, traits, locations, and trials. A given list can only contain one type of items, for example, all items have to be of type location in a list of locations. Lists are attached to the individual user’s account, and can only be created and seen by the user while logged in, however, lists can be made public for all other users to see. SGN databases make heavy use of lists in a number of tools on the website. For example, trials are created using lists of accessions.
1.4.1 Creating lists
Lists can be generated in various ways:
One way to create a list is by clicking on the “Lists” link located on the toolbar.

To create a new list, enter the name of your new list and then click on the “New List” button. The name of the list can be anything, but should be unique and should be something to help you easily identify the list.

If the list already exists, it will appear on the “Your Lists” dialog. To add items to your list, click on the “View” icon to open the “List Contents” section.

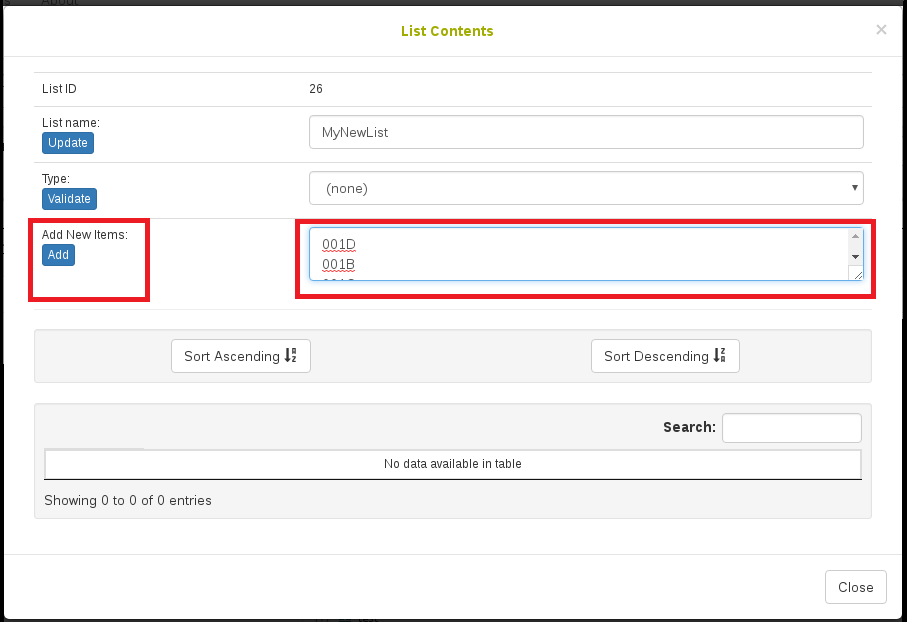
On the “List Contents” page, enter items that you want to add to the list, then click on “Add” button.

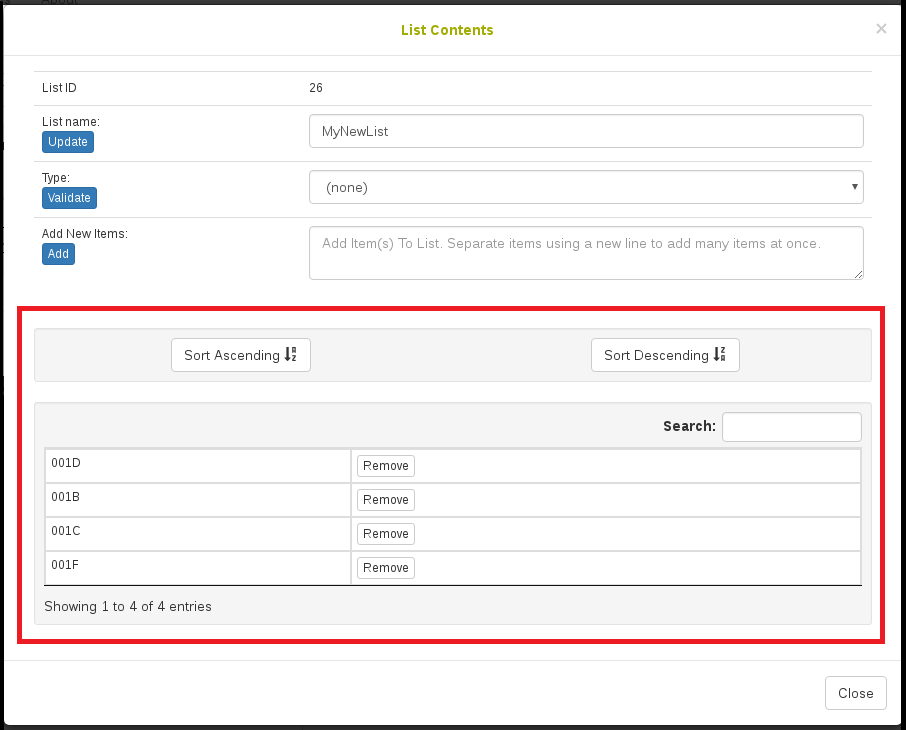
The page will be updated and will display your items in a table at the bottom of the dialog It is possible to sort the list if you need.

Select the type of items in your list. To verify that the items that you added to your list are already stored in the database and that you selected a correct type for the items, click on the “Validate” button.

If those items are already in the database, a message will indicate that “This list passed validation”

Note that a list cannot contain duplicate elements. If a duplicate item is entered, the list manager will inform the user that the element is already in the list and will not add it again.
Another easy way to create a list is to use the 2.1, which can be accessed from the Search menu.
1.4.2 Viewing and editing lists
Lists can be viewed and edited using the “Lists” link on the toolbar. Clicking on the link will open a dialog that displays all of your lists, as well as an option to create new lists.

This page shows all lists that have been created, including those created by using the Search Wizard. You can view and edit your lists by using “Actions” buttons.
Clicking on the “view” icon will open a new window called “List Contents” that allows you to change the list name, the type of the list, add new items, or delete existing items.
Clicking on the “delete” icon will delete your list. Caution: this action cannot be undone.
Clicking on the “download” icon will download the contents of your list to your computer.
Clicking on the “make public” icon will make your list available for other users to view and use your list.

1.5 User Permissions
Breedbase accounts are assigned one or more of four different roles to determine the level of access they have within the database. The possible roles are User, Submitter, Sequencer, and Curator. Each role grants specific permissions, and careful management of them helps prevent data from being altered or deleted in error.

Accounts are also assigned Breeding Program role(s) to grant access to the specfic breeding program(s) they work with.
- The User role gives an account permission to view and download data throughout the database.
- The Submitter role gives an account permission to design field experiments and to upload and edit data using the tools in the “Manage” section. In order to submit and manage breeding data within a given breeding program, a submitter also must have a matching Breeding Program role.
- The Sequencer role gives an account permission to design genotyping experiments and submit plates to a genotyping service.
- The Curator role gives an account permission to do all of the above, as well as to delete data within the database. The Curator role also enables the addition or deletion of roles for all database accounts in the ‘Manage User Roles’ tool.
